Setting up AutoPay
Get step-by-step instructions on setting up AutoPay
Get started with AutoPay
Before installation:
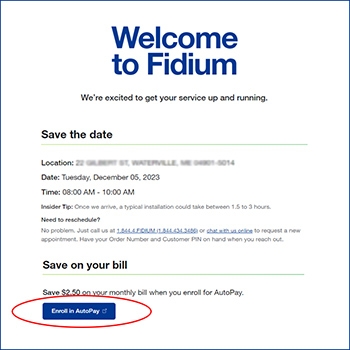
New Fidium customers can first activate their Fidium Insider Portal account by clicking on the activation link sent in your intial portal registration email. After signing into the portal, you can set-up AutoPay by clicking on the blue "Enroll in AutoPay" button on the "Welcome to Fidium" page. Enroll in AutoPay before your installation!

After installation:
If you sign up for AutoPay after your installation, first sign into your Fidium Insider Portal account and click on "Manage AutoPay" under the "Billing & Payments" section on the Fidium.net dashboard.
Add a payment method
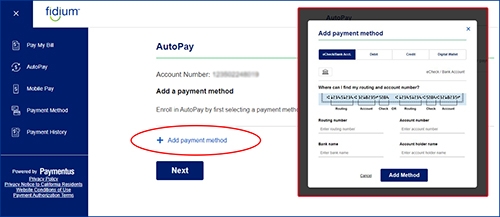
The first step to enrolling in AutoPay is selecting a payment method. You can edit or delete your payment method at any time.
Available payment methods:
- Bank account
- Credit or debit card
- PayPal
- Venmo
- Google Pay
- Apple Pay
Manage AutoPay after enrollment
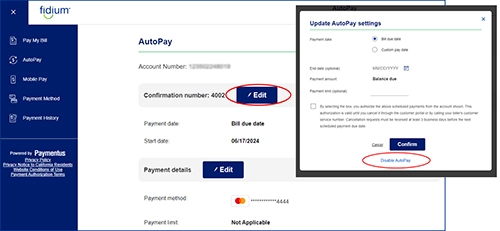
Edit AutoPay settings:
After you are enrolled in AutoPay, you can manage settings by clicking on the blue "Edit" button. If you wish to discontinue AutoPay, you can click on the "Disable AutoPay" link in the pop-up. Please note that your $2.50/month credit will also be removed from your account.
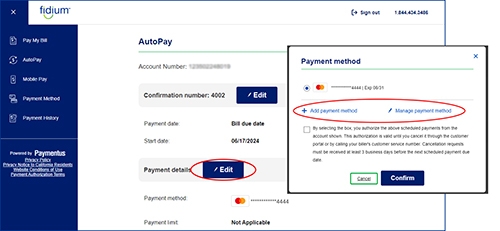
Edit AutoPay payment details:
After you are enrolled in AutoPay, if you wish to add a payment method or edit an existing payment method, you can click on the blue "Edit" button.
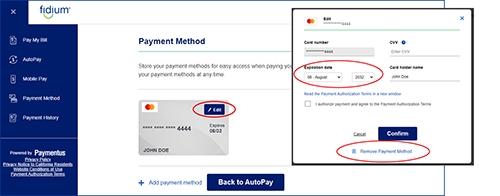
Edit payment method:
Click the blue "Edit" button under the "Payment details" section, then click on the "Manage payment method" link in the pop-up. On the Payment Method page, click on the blue "Edit" button associated with your current payment method. Here you can manage an expiration date on a debit or credit card or remove a payment method. Please note that by removing a payment method tied to your AutoPay, this will also disable your Autopay enrollment.